Loading...
Last updated on
In this quickstart, you’ll learn how to get up and running with GenSX, a simple typescript framework for building complex LLM applications.
Before getting started, make sure you have the following:
gensx CLIYou can install the gensx CLI using your package manager of choice:
npm i -g gensxAlternatively, if you prefer not to install the CLI globally, you can prefix every command in this guide with npx.
If you want to be able to visualize your workflows and view traces, you’ll need to log in to GenSX Cloud. This is optional, but recommended.
To log in to GenSX Cloud, run the following command:
gensx loginYou’ll be redirected to the GenSX website and will need to create an account if you don’t have one already.
Once you’re logged in, you’re ready to create a workflow! Workflow traces will automatically be saved to the cloud so you can visualize and debug workflow executions.
To get started, run the new command with a project name of your choice. This will create a new GenSX project with a simple workflow to get you started.
gensx new <project-name>When creating a new project, you’ll be prompted to select IDE rules to add to your project. These rules help AI assistants like Claude, Cursor, Cline, and Windsurf understand your GenSX project better, providing more accurate code suggestions and help.
In src/workflows.ts, you’ll find a simple Chat component and workflow:
import * as gensx from "@gensx/core";
import { openai } from "@ai-sdk/openai";
import { generateText } from "@gensx/vercel-ai";

interface ChatProps {
  userMessage: string;
}

const Chat = gensx.Component("Chat", async ({ userMessage }: ChatProps) => {
  const result = await generateText({
    model: openai("gpt-4.1-mini"),
    messages: [
      {
        role: "system",
        content: "You are a helpful assistant.",
      },
      { role: "user", content: userMessage },
    ],
  });
  return result.text;
});

const ChatWorkflow = gensx.Workflow(
  "ChatWorkflow",
  async ({ userMessage }: ChatProps) => {
    return await Chat({ userMessage });
  },
);

export { ChatWorkflow };
This template shows the basics of building a GenSX workflow:
gensx.Component() and gensx.Workflow() along with a name and a function.@gensx/vercel-ai, @gensx/openai, and @gensx/anthropic out of the box. These packages are simply wrappers around the original packages optimized for GenSX.The project template includes a src/index.ts file that you can use to run the workflow:
import { ChatWorkflow } from "./workflows.js";

const result = await ChatWorkflow({
  userMessage: "Hi there! Say 'Hello, World!' and nothing else.",
});

console.log(result);
There’s nothing special here—workflows are just invoked like any other function.
To run the workflow, you’ll need to set the OPENAI_API_KEY environment variable.
# Set the environment variable
export OPENAI_API_KEY=<your-api-key>

# Run the project
pnpm dev
This will run the workflow and print the workflow’s output to the console along with a URL to the trace (if you’re logged in).
[GenSX] View execution at: https://console/<org>/<project>/executions/<run-id>?workflowName=ChatWorkflow

Hello, World!
You can now view the trace for this run in GenSX Cloud by clicking the link:

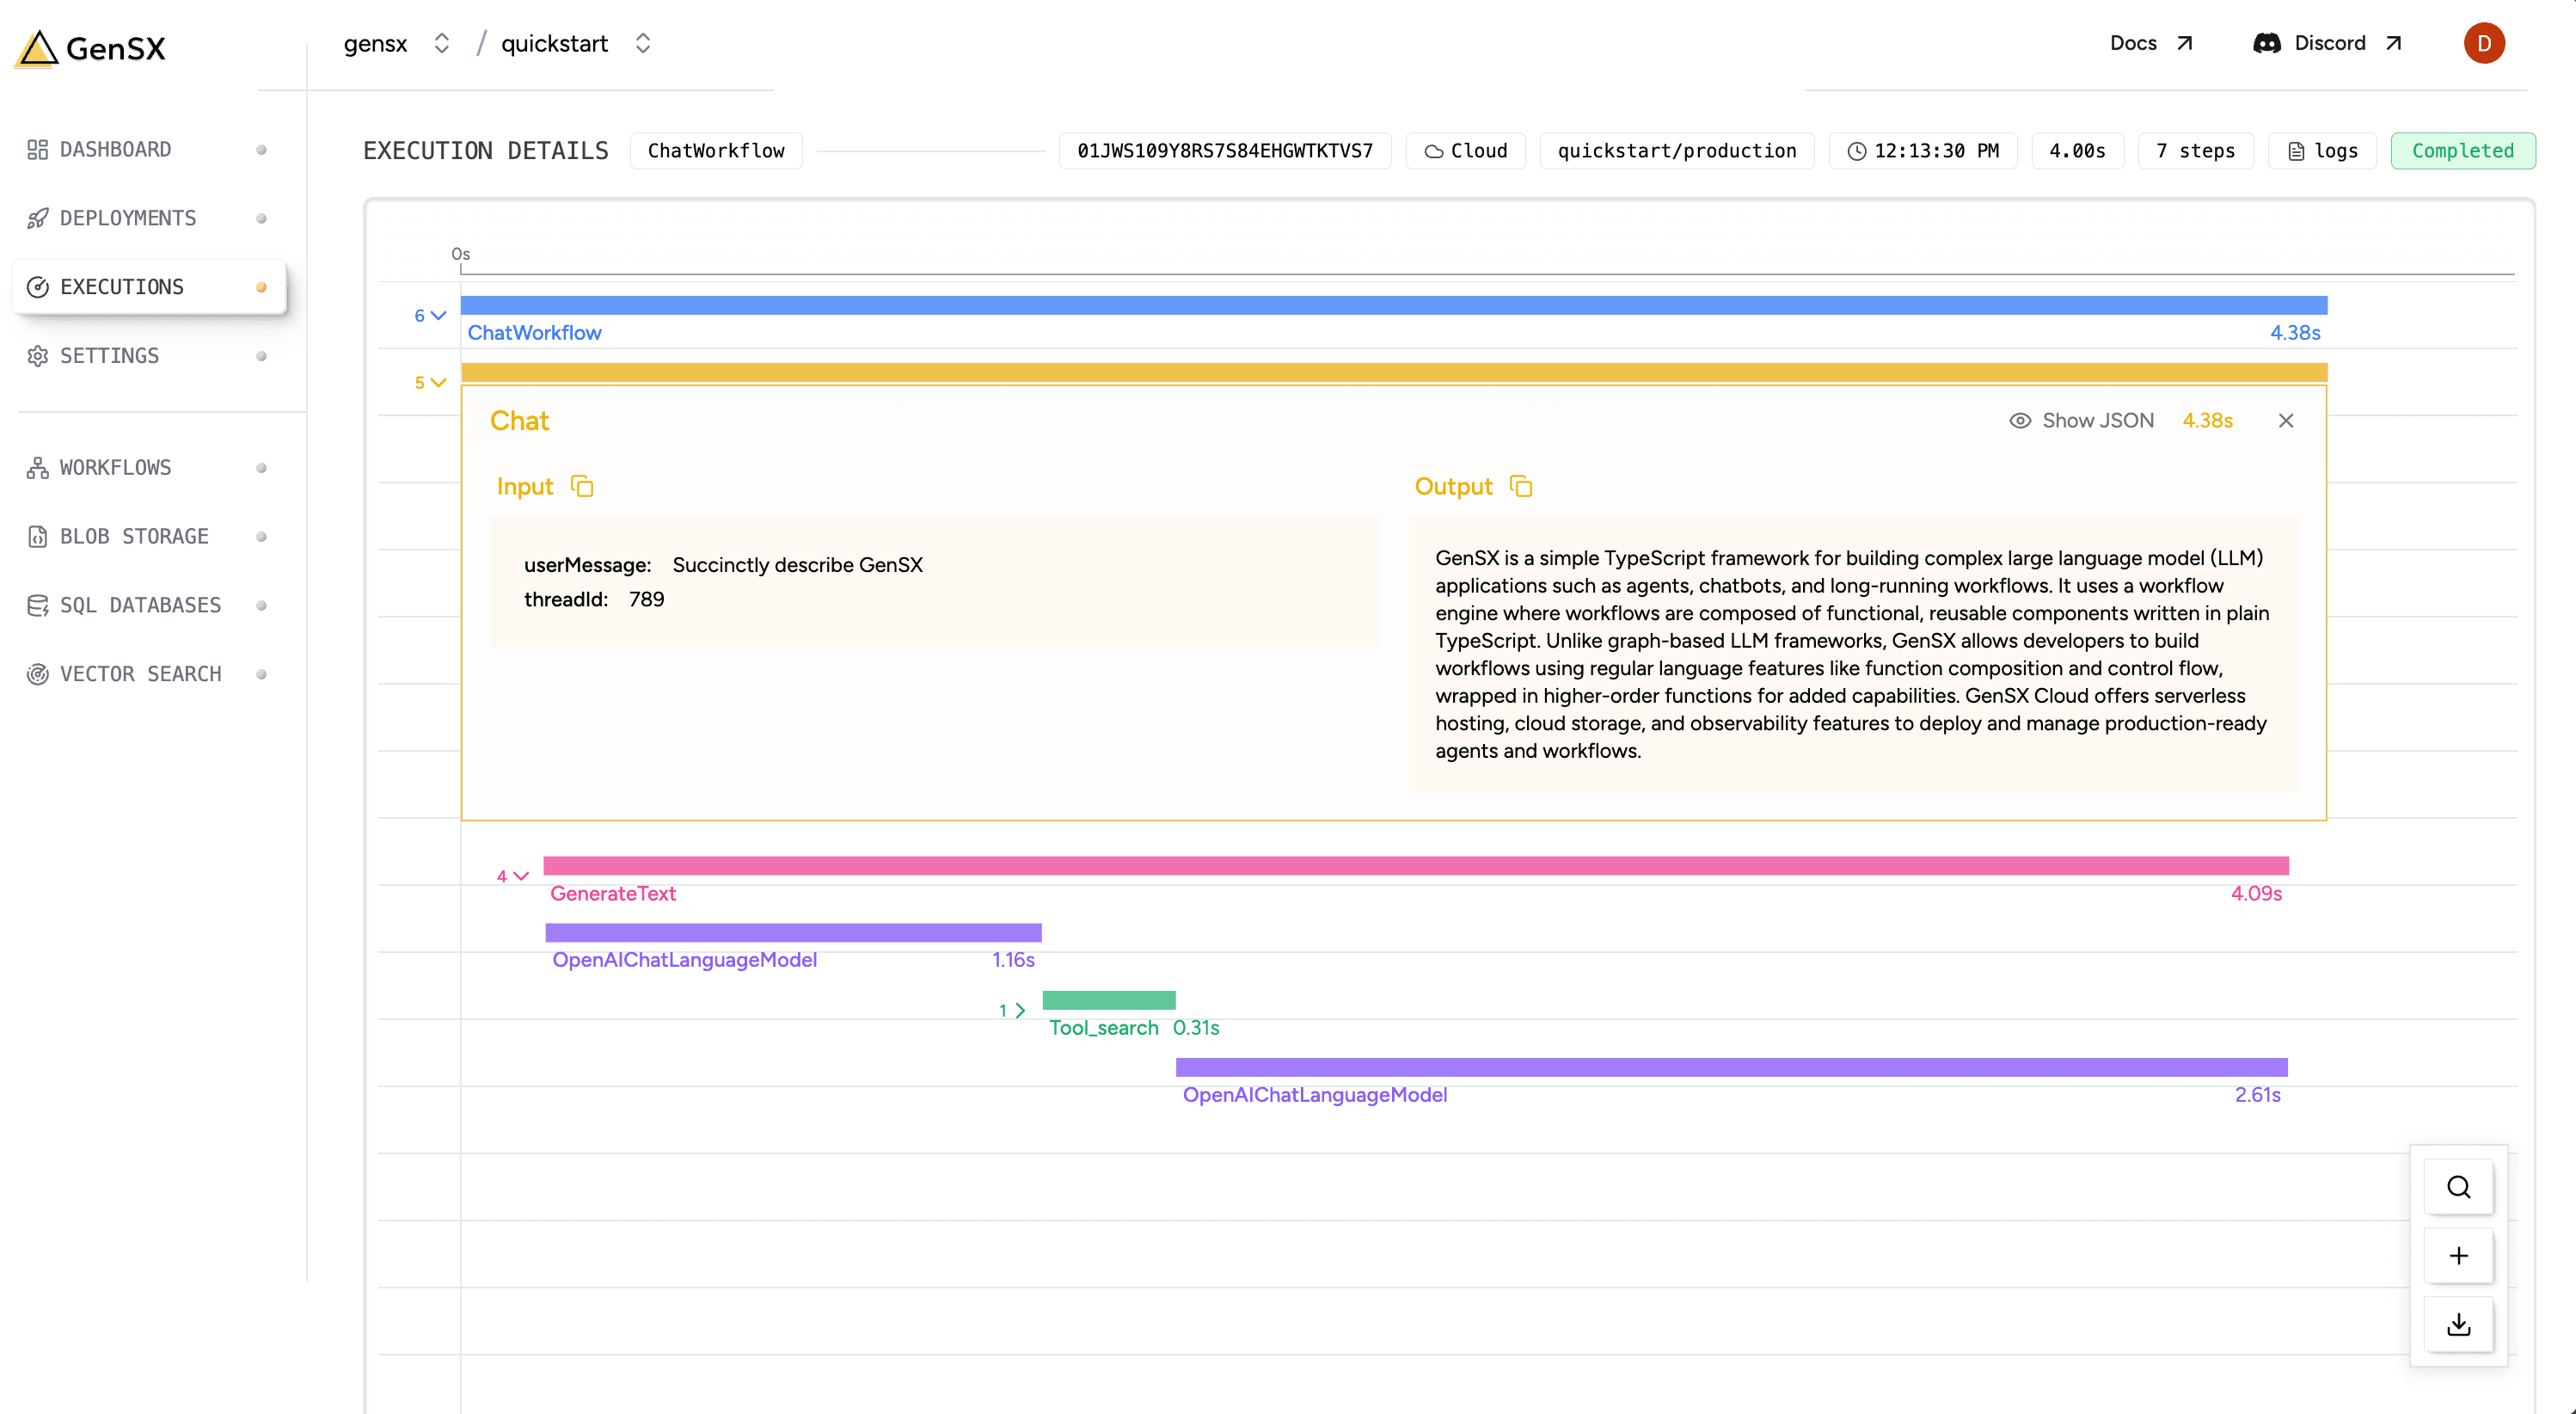
The trace shows a flame graph of your workflow, including every component that executed with inputs and outputs.
Some components will be hidden by default, but you can click the carat to expand them. Clicking on a component will show you details about it’s inputs and outputs.
For longer running workflows, this view will update in real-time as the workflow executes.
Now that you’ve built your first workflow, you can easily turn it into a REST API.
GenSX provides a local development server with local REST APIs that match the shape of workflows deployed to GenSX Cloud. You can run the dev server from the CLI:
# Start the development server
gensx start src/workflows.ts
The development server provides several key features:
http://localhost:1337/swagger-uiYou’ll see something like this when you start the server:
🚀 GenSX Dev Server running at http://localhost:1337
🧪 Swagger UI available at http://localhost:1337/swagger-ui

Available workflows:
- ChatWorkflow: http://localhost:1337/workflows/ChatWorkflow

Listening for changes... 10:58:55 AM
You can now test your workflow by sending requests to the provided URL using any HTTP client, or using the built-in Swagger UI at http://localhost:1337/swagger-ui.
Now that you’ve tested your APIs locally, you can deploy them to the cloud. GenSX Cloud provides serverless deployment with zero configuration:
# Deploy your project to GenSX Cloud
gensx deploy src/workflows.ts -e OPENAI_API_KEY
This command:
For production deployments, you can target a specific environment:
# Deploy to production environment
gensx deploy src/workflows.ts -e OPENAI_API_KEY --env productionOnce deployed, you can execute your workflows directly from the command line:
# Run a workflow synchronously
gensx run ChatWorkflow --input '{"userMessage":"Write a poem about an AI loving raccoon"}'

# Save the output to a file
gensx run ChatWorkflow --input '{"userMessage":"Write a haiku"}' --output result.json
The CLI makes it easy to test your workflows and integrate them into scripts or automation.
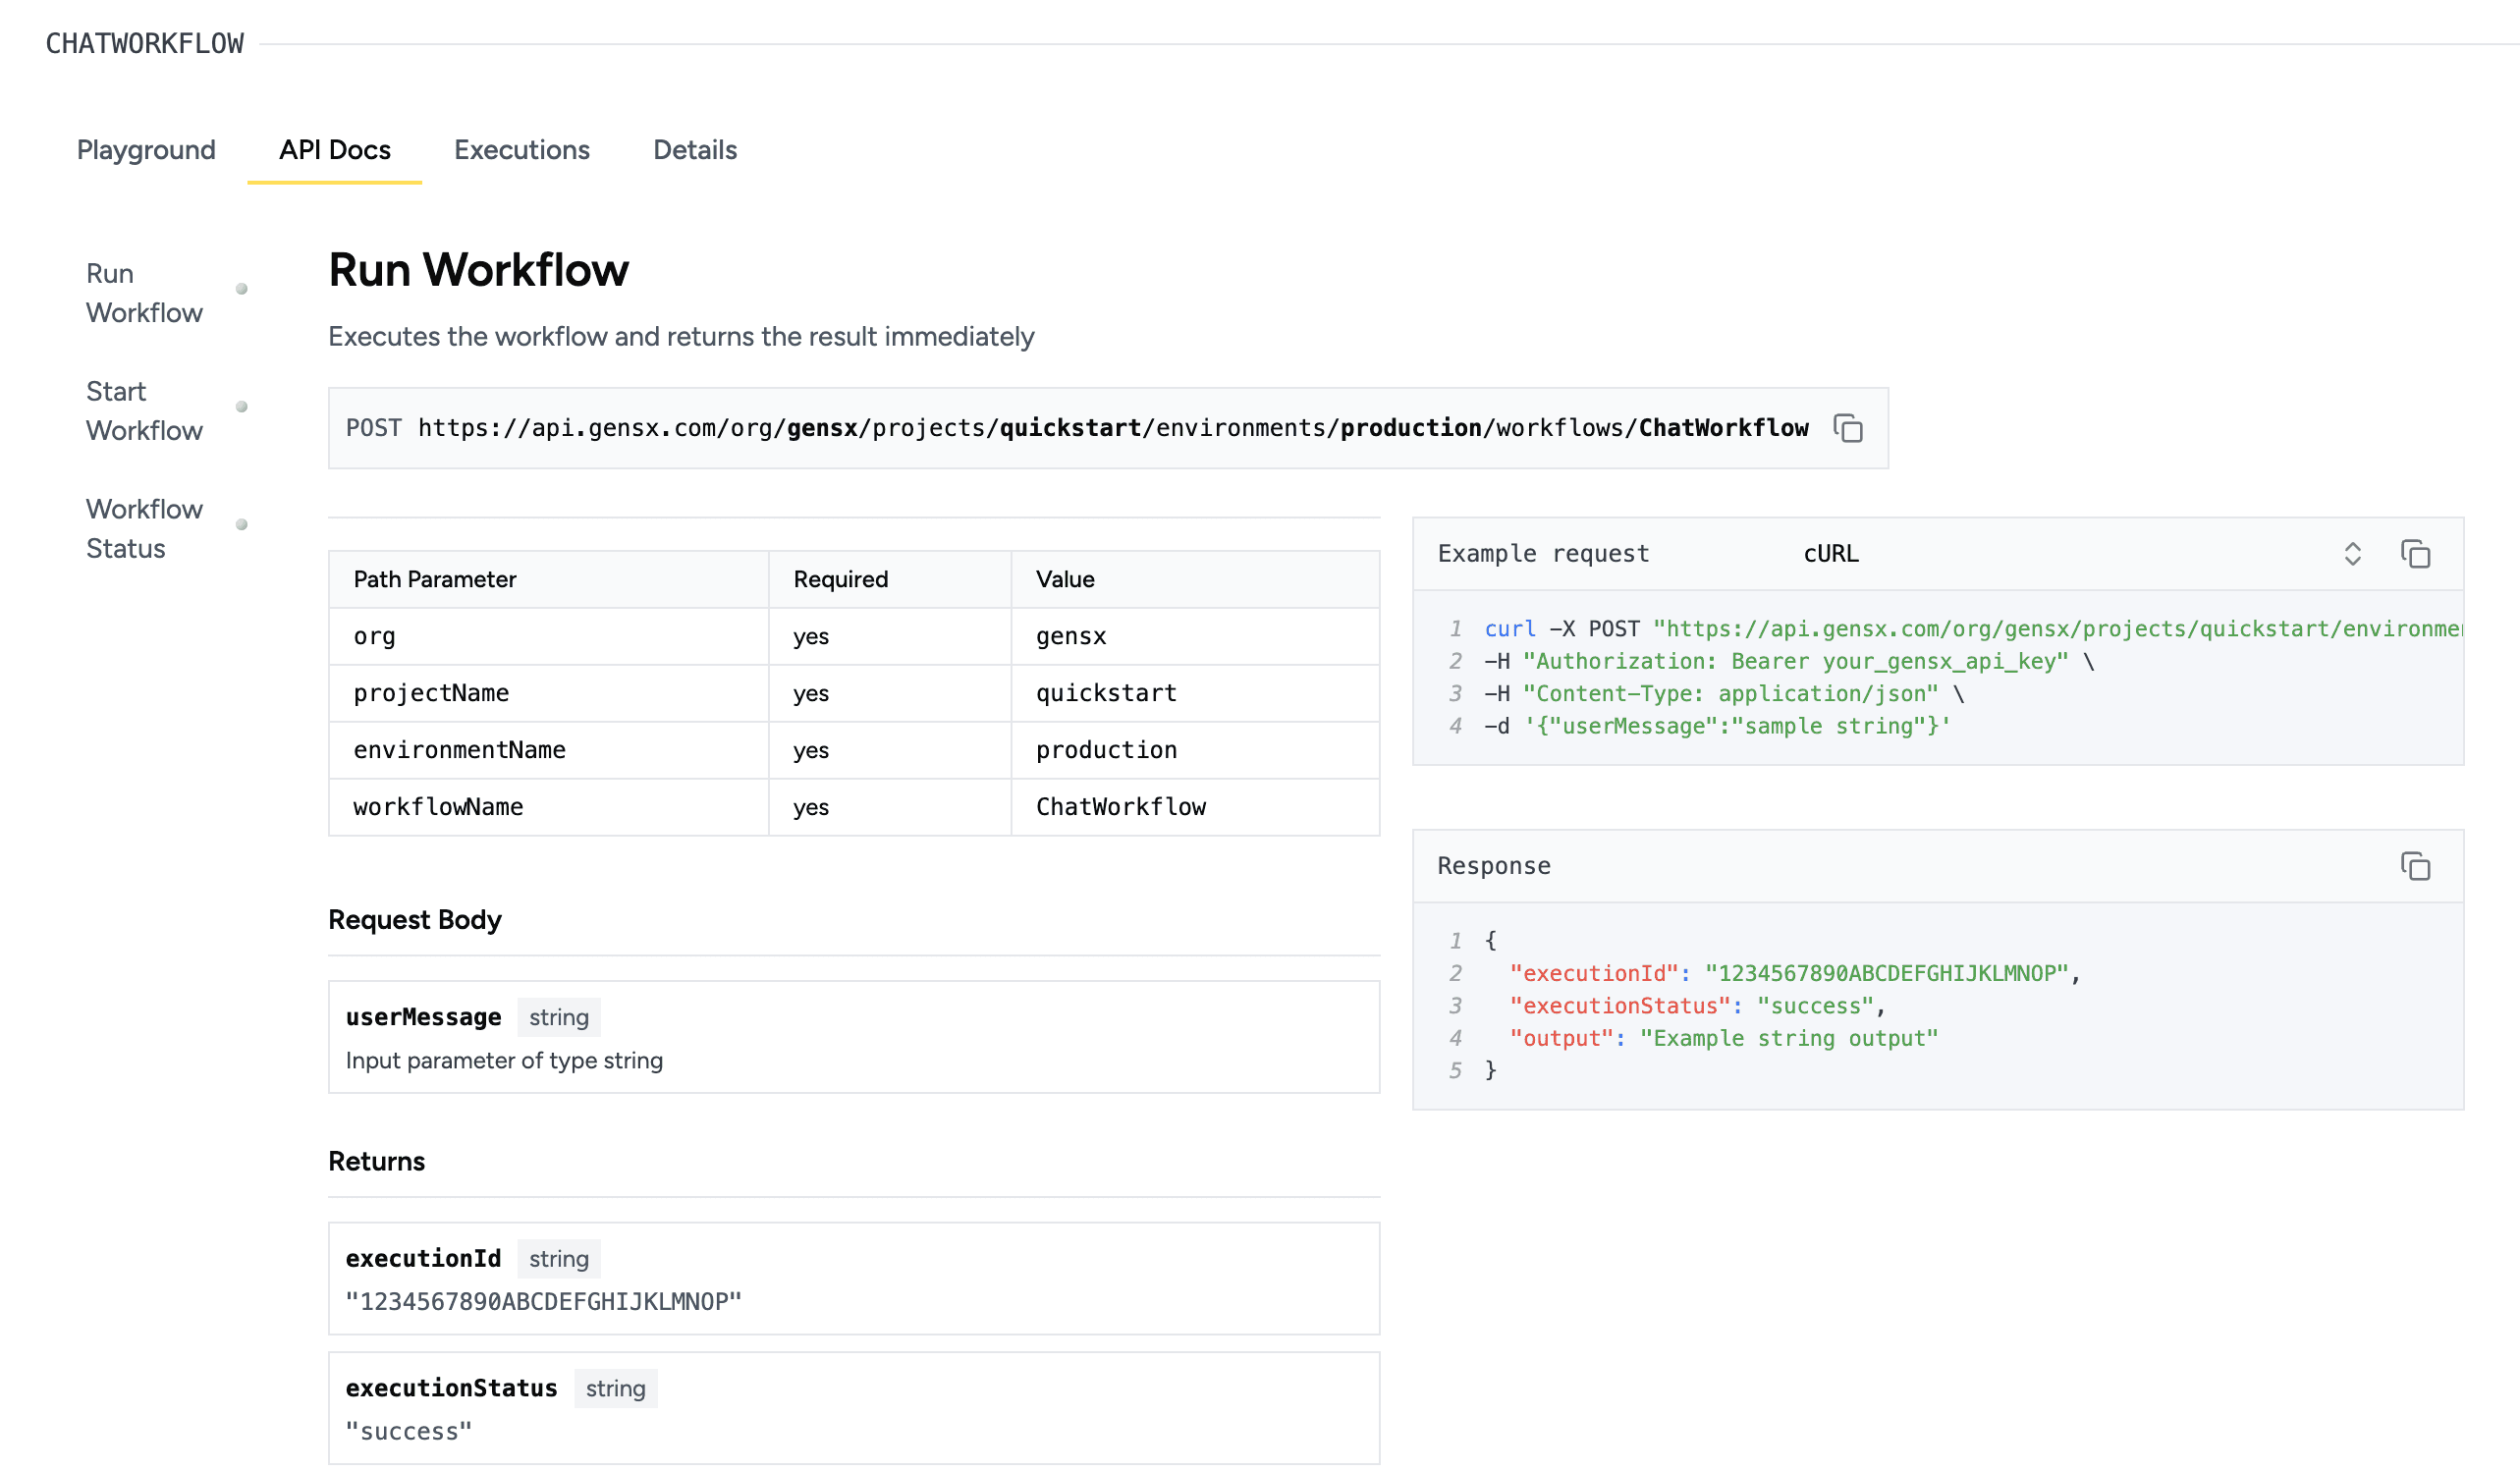
The GenSX Cloud console provides a visual interface for managing and executing your workflows:
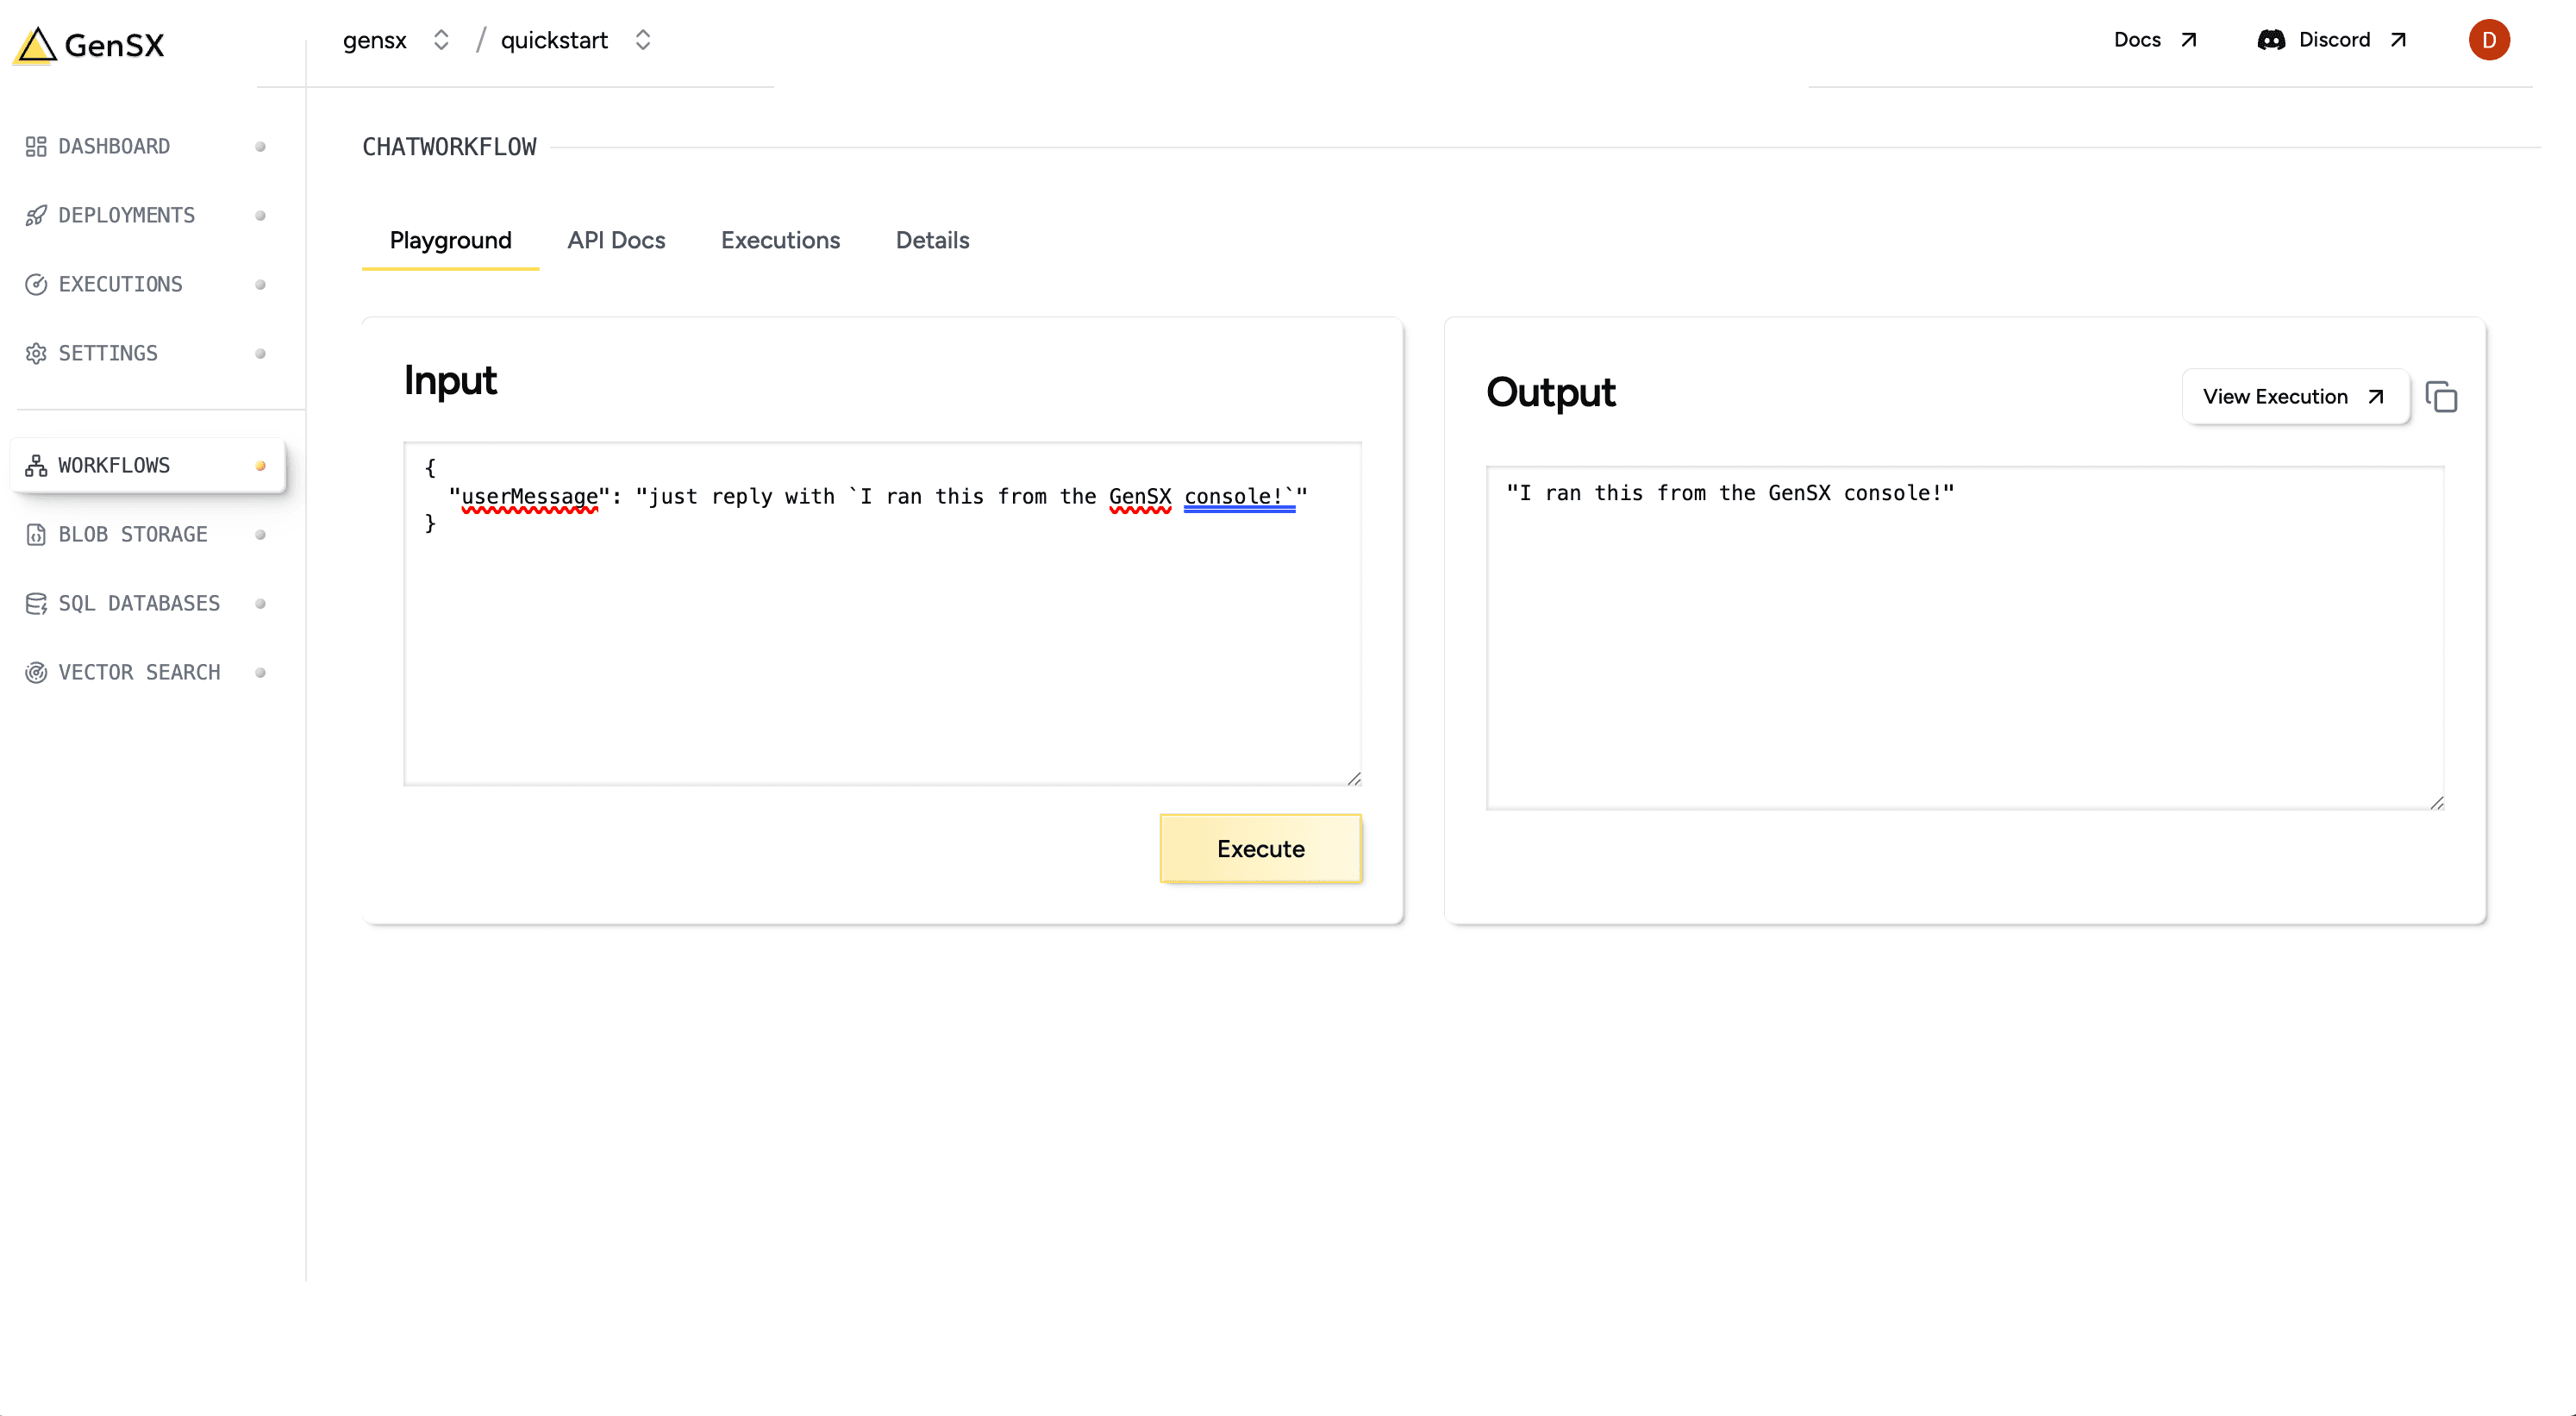
The console also provides API documentation and code snippets for your workflows as well as execution history and tracing for all previous workflow runs.
Now that you’ve deployed your first workflow, you can use GenSX’s cloud storage to build more sophisticated workflows. GenSX offers three types of built-in storage: blob storage, sql database storage and full text and vector search storage.
In this section, we’ll add chat history using blob storage and then add in RAG using vector search.
To start, we’ll add chat history to our workflow. First, we need to install the @gensx/storage package then import the useBlob hook.
npm install @gensx/storageimport { useBlob } from "@gensx/storage";Next, we need to update the interfaces for our workflow.
interface ChatProps {
  userMessage: string;
  threadId: string; // add thread id for tracking the history
}

// Add this interface for storing chat history
interface ChatMessage {
  role: "system" | "user" | "assistant";
  content: string;
}
Now, we’re ready to update the Chat component to use blob storage to store chat history.
const Chat = gensx.Component(
  "Chat",
  async ({ userMessage, threadId }: ChatProps) => {
    // Function to load chat history
    const loadChatHistory = async (): Promise<ChatMessage[]> => {
      const blob = useBlob<ChatMessage[]>(`chat-history/${threadId}.json`);
      const history = await blob.getJSON();
      return history ?? [];
    };

    // Function to save chat history
    const saveChatHistory = async (messages: ChatMessage[]): Promise<void> => {
      const blob = useBlob<ChatMessage[]>(`chat-history/${threadId}.json`);
      await blob.putJSON(messages);
    };

    try {
      // Load existing chat history
      const existingMessages = await loadChatHistory();

      // Add the new user message
      const updatedMessages = [
        ...existingMessages,
        { role: "user", content: userMessage } as ChatMessage,
      ];

      // Generate response using the model
      const result = await generateText({
        messages: updatedMessages,
        model: openai("gpt-4.1-mini"),
      });

      // Add the assistant's response to the history
      const finalMessages = [
        ...updatedMessages,
        { role: "assistant", content: result.text } as ChatMessage,
      ];

      // Save the updated chat history
      await saveChatHistory(finalMessages);

      console.log(
        `[Thread ${threadId}] Chat history updated with new messages`,
      );

      return result.text;
    } catch (error) {
      console.error("Error in chat processing:", error);
      return `Error processing your request in thread ${threadId}. Please try again.`;
    }
  },
);

const ChatWorkflow = gensx.Workflow(
  "ChatWorkflow",
  async ({ userMessage, threadId }: ChatProps) => {
    return await Chat({ userMessage, threadId });
  },
);
When run locally, GenSX blob storage will just write to the local filesystem and when you deploy the workflow it will automatically start using cloud storage.
After you’ve made these updates, deploy and run the workflow again to see chat history in action.
gensx deploy src/workflows.ts -e OPENAI_API_KEY

# send an initial message to the thread
gensx run ChatWorkflow --input '{"userMessage":"Name the capital of France", "threadId":"123"}'

# use the same thread
gensx run ChatWorkflow --input '{"userMessage":"What was my previous message?", "threadId":"123"}'
You should see that the model remembers the previous message. You can also go to the Blob Storage tab in the GenSX Cloud console and see the blob that was created.
Next, let’s add RAG to our workflow. We’ll use GenSX’s llms-full.txt file and store it in GenSX’s vector search.
First, we need to build a workflow that will populate the vector search namespace. Add this to your workflows.ts file.
import { useSearch } from "@gensx/storage";
import { embedMany } from "@gensx/vercel-ai";

export const InitializeSearch = gensx.Workflow("InitializeSearch", async () => {
  // useSearch will create the namespace automatically if it doesn't exist.
  const namespace = await useSearch("gensx-docs");

  // Fetch content from the URL
  const content = await (
    await fetch("https://www.gensx.com/llms-full.txt")
  ).text();

  // Split content on H1 headings and filter out empty sections
  const documents = content
    .split(/\n# /)
    .map((text, i) => ({ id: `section-${i + 1}`, text: text.trim() }))
    .filter((doc) => doc.text.length > 0);

  // Create embeddings for the documents
  const embeddings = await embedMany({
    model: openai.embedding("text-embedding-3-small"),
    values: documents.map((doc) => doc.text),
  });

  // Write the documents to the vector search namespace
  await namespace.write({
    upsertRows: documents.map((doc, index) => ({
      id: doc.id,
      vector: embeddings.embeddings[index],
      text: doc.text,
    })),
    distanceMetric: "cosine_distance",
  });

  return `Search namespace initialized`;
});
Next, let’s add a tool that will use the vector search namespace to answer questions.
import { useSearch } from "@gensx/storage";
import { tool } from "ai";
import { z } from "zod";
import { embed } from "@gensx/vercel-ai";

const tools = {
  search: tool({
    description: "Search the GenSX documentation",
    parameters: z.object({
      query: z.string().describe("the search query"),
    }),
    execute: async ({ query }: { query: string }) => {
      const namespace = await useSearch("gensx-docs");

      const { embedding } = await embed({
        model: openai.embedding("text-embedding-3-small"),
        value: query,
      });

      // Search for similar documents
      const results = await namespace.query({
        rankBy: ["vector", "ANN", embedding],
        topK: 5,
        includeAttributes: true,
      });

      return results;
    },
  }),
};
Finally, update the Chat component to use the new tool. You also need to set maxSteps to allow the sdk to process the tool calls.
const result = await generateText({
  messages: updatedMessages,
  model: openai("gpt-4.1-mini"),
  tools,
  maxSteps: 5,
});
Great! Now you’re ready to deploy the workflows and test them:
gensx deploy src/workflows.ts -e OPENAI_API_KEY

# initialize the search namespace
gensx run InitializeSearch

# run the workflow
gensx run ChatWorkflow --input '{"userMessage":"Succinctly describe GenSX", "threadId":"789"}'
Now when you go look at the trace, you’ll see that the model used the tool call to search the GenSX documentation. The trace allows you to see all the inputs and outputs of each component including the inputs and outputs of the tool call.
Explore these resources to dive deeper into GenSX:
Check out these example projects to see GenSX in action: