Loading...
Last updated on
Note: GenSX Cloud is currently in developer preview.
GenSX Cloud provides everything you need to ship production-grade agents and workflows:
Unlike traditional serverless offerings, GenSX Cloud is optimized for long-running workflows. Free tier workflows can run up to 5 minutes and Pro tier workflows can run for up to 60 minutes.
All of this is available on a free tier for individuals.
Serverless deployments allow you to turn your GenSX workflows and agents into APIs with a single command:
gensx deploy generates a REST API complete with schema and validation for every workflow in your project.Serverless deployments are billed per-second, with 50,000 seconds included per month in the free tier for individuals.
Projects are deployed with a single CLI command:
$ npx gensx deploy ./src/workflows.ts✔ Building workflow using Docker
✔ Generating schema
✔ Successfully built project
ℹ Using project name from gensx.yaml: support-tools
✔ Deploying project to GenSX Cloud (Project: support-tools)
✔ Successfully deployed project to GenSX Cloud
Dashboard: console/support-tools/default/workflows
Available workflows:
- ChatAgent
- TextToSQLWorkflow
- RAGWorkflow
- AnalyzeDiscordWorkflow
Project: support-toolsEach workflow is available via both a synchronous and asynchronous API:
// For synchronous and streaming calls:
https://api.gensx.com/org/{orgName}/projects/{projectName}/environments/{environmentName}/workflows/{workflowName}
// For running workflows async in the background
https://api.gensx.com/org/{orgName}/projects/{projectName}/environments/{environmentName}/workflows/{workflowName}/start
For more details see the full serverless deployments reference.
GenSX Cloud includes runtime-provisioned storage to build stateful agents and workflows:
State can be long-lived and shared across workflows and agents, or it can be provisioned ephemerally on a per-request basis.
GenSX Cloud provides blob storage for persisting unstructured data like JSON, text, and binary files. With the useBlob hook, you can easily store and retrieve data across workflow executions.
Common scenarios enabled by blob storage include:
import { useBlob } from "@gensx/storage";

// Store and retrieve data with the useBlob hook
const UpdateConversation = gensx.Component(
  "UpdateConversation",
  async ({ userInput, threadId }: UpdateConversationInput) => {
    // Get access to a blob at a specific path
    const blob = useBlob(`chats/${threadId}.json`);

    // Load existing data (returns null if it doesn't exist)
    const history = (await blob.getJSON()) ?? [];

    // Add new data
    history.push({ role: "user", content: userInput });

    // Save updated data
    await blob.putJSON(history);

    return "Data stored successfully";
  },
);
Blob storage automatically adapts between local development (using filesystem) and cloud deployment with zero configuration changes.
For more details see the full storage components reference.
GenSX Cloud provides SQLite-compatible databases powered by Turso , enabling structured data storage with several properties important to agentic workloads:
import { useDatabase } from "@gensx/storage";

// Access a database with the useDatabase hook
const QueryTeamStats = gensx.Component(
  "QueryTeamStats",
  async ({ team }: QueryTeamStatsInput) => {
    // Get access to a database (created on first use)
    const db = await useDatabase("baseball");

    // Execute SQL queries directly
    const result = await db.execute("SELECT * FROM players WHERE team = ?", [
      team,
    ]);

    return result.rows; // Returns the query results
  },
);
For more details see the full storage components reference.
GenSX Cloud provides vector and full-text search capabilities powered by turbopuffer , enabling semantic search and retrieval augmented generation (RAG) with minimal setup:
import { useNamespace } from "@gensx/storage";
import { embed } from "@gensx/vercel-ai";
import { openai } from "@ai-sdk/openai";

// Perform semantic search with the useNamespace hook
const SearchDocuments = gensx.Component(
  "SearchDocuments",
  async ({ query }) => {
    // Get access to a vector search namespace
    const namespace = await useNamespace("documents");

    // Generate an embedding for the query
    const { embedding } = await embed({
      model: openai.embedding("text-embedding-3-small"),
      value: query,
    });

    // Search for similar documents
    const results = await namespace.query({
      vector: embedding,
      topK: 5,
    });

    return results.map((r) => r.attributes?.title);
  },
);Note: Unlike blob storage and SQL databases, vector search doesn’t have a local development implementation. When using
useSearchlocally, you’ll connect to the cloud service.
For more details see the full storage components reference.
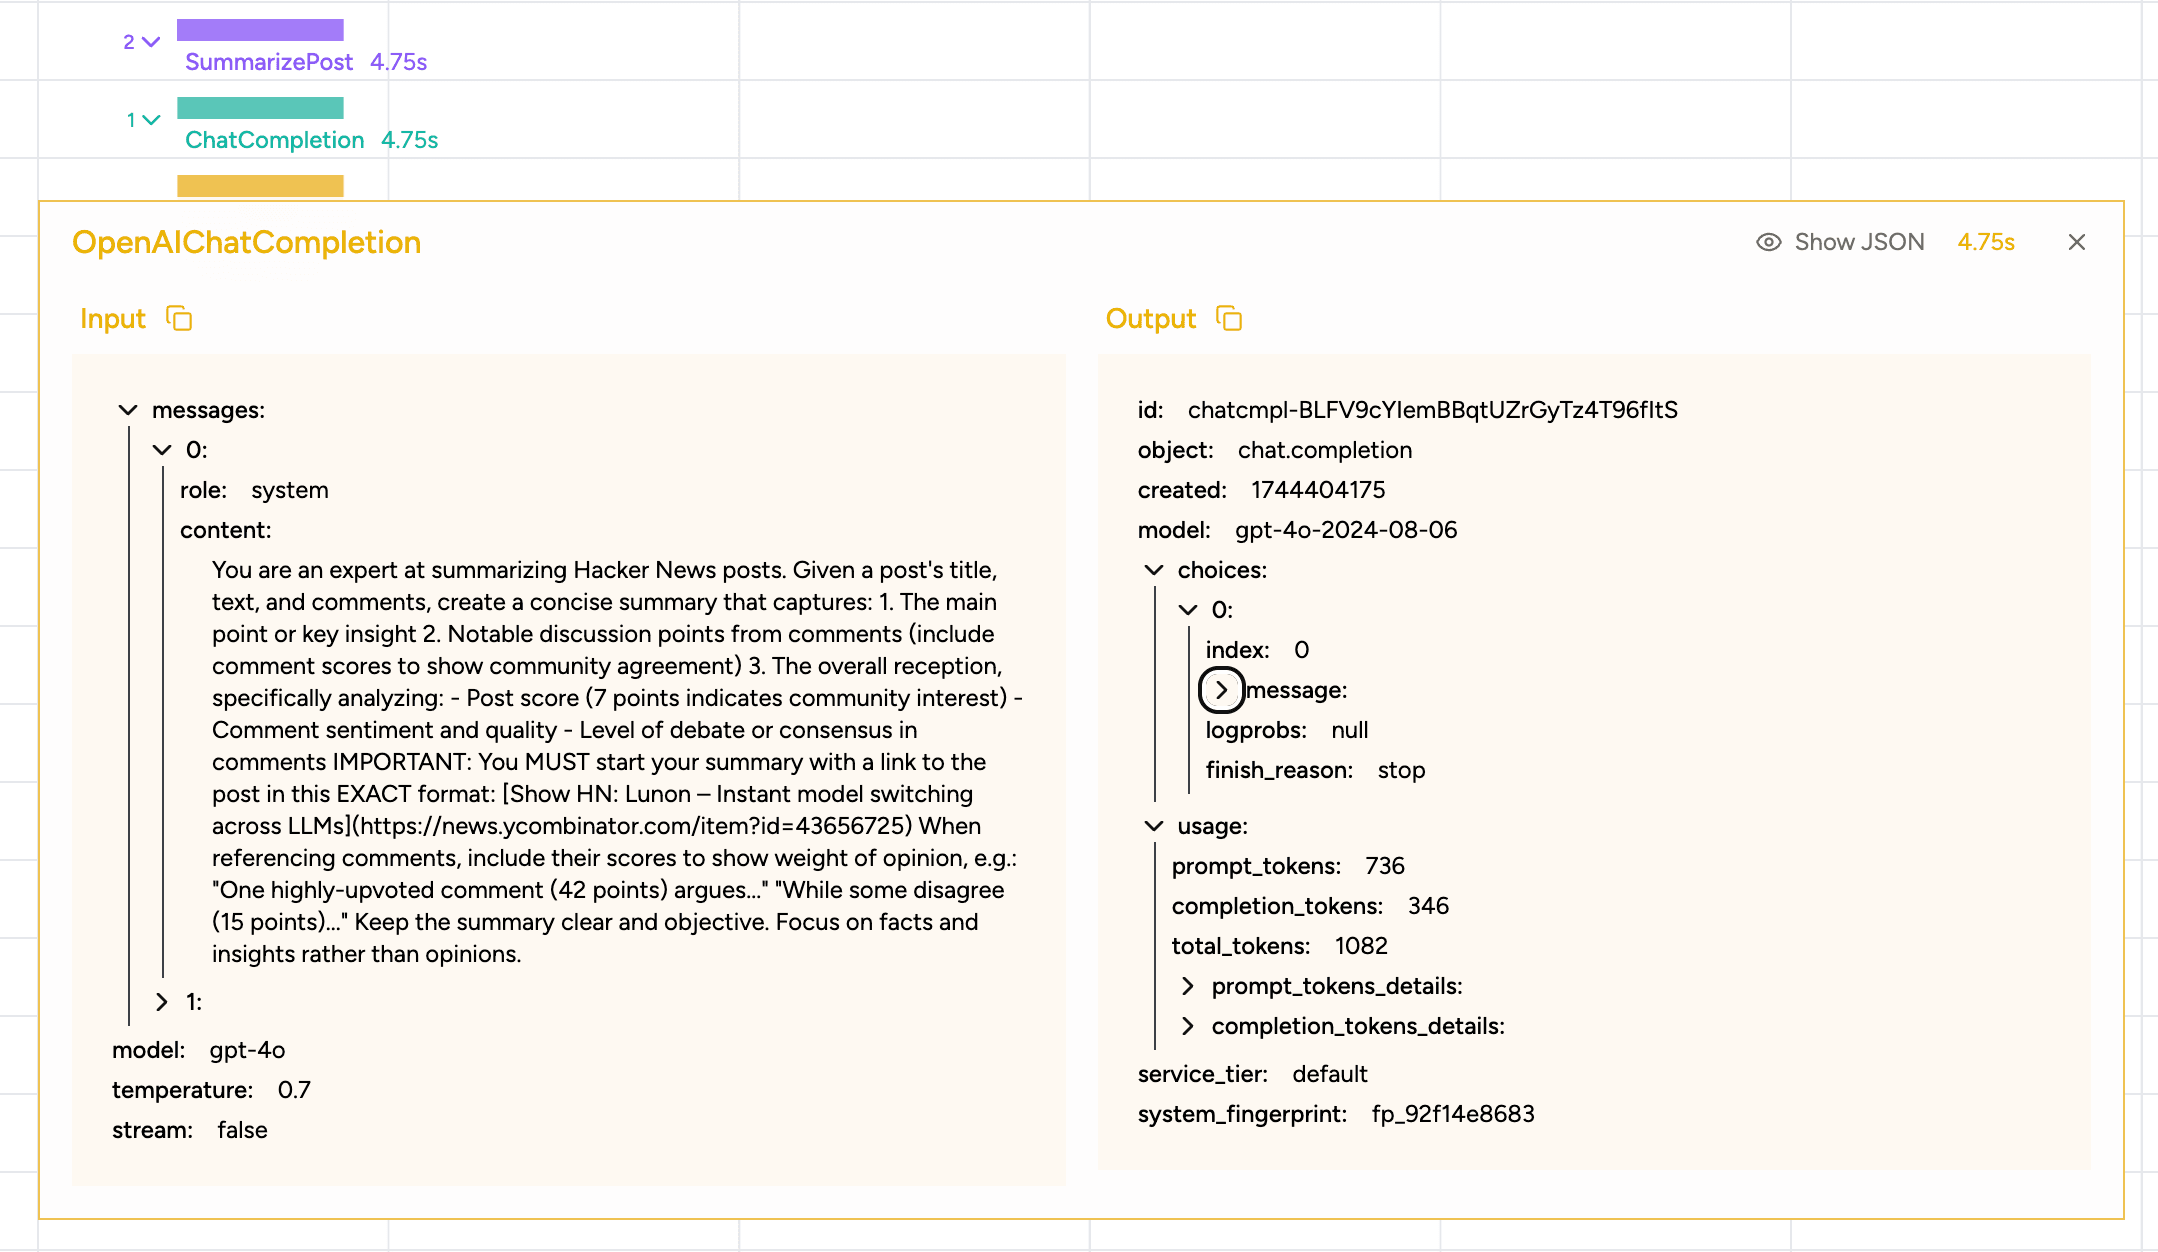
GenSX Cloud provides comprehensive tracing and observability for all your workflows and agents.
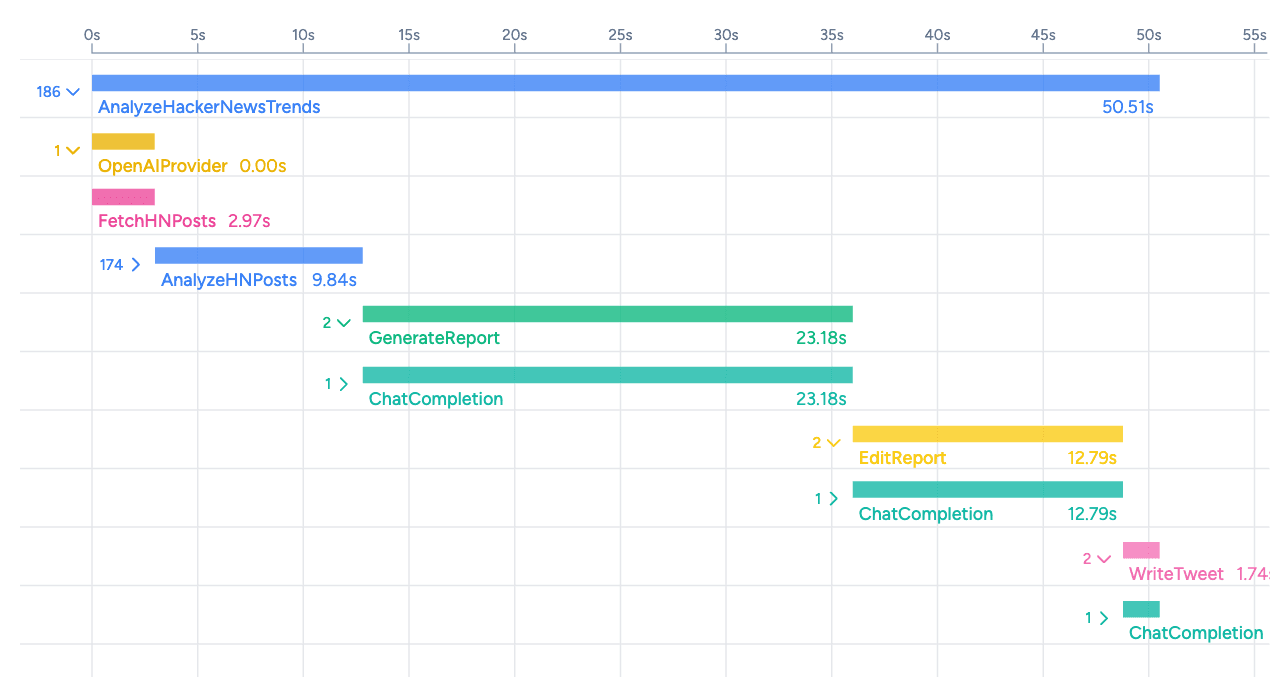
Complete execution traces: Every workflow execution generates a detailed trace that captures the entire flow from start to finish, allowing you to understand exactly what happened during execution.
Comprehensive component visibility: Each component in your workflow automatically records its inputs and outputs, including:
Real-time monitoring: Watch your workflows execute step by step in real time, which is especially valuable for debugging long-running agents or complex multi-step workflows.
Historical execution data: Access and search through all past executions to diagnose issues, analyze performance patterns, and understand user interactions over time.
Project and environment organization: Traces are automatically organized by project (a collection of related workflows in a codebase) and environment (such as development, staging, or production), making it easy to find relevant executions.
// Traces are automatically captured when workflows are executed
// No additional instrumentation required
const result = await MyWorkflow({ input: "some query" });
The trace viewer provides multiple ways to analyze workflow execution:
For more details see the full observability reference.
GenSX provides a seamless development experience that mirrors the cloud environment, allowing you to build and test your workflows locally before deployment:
The gensx start command launches a local development server that:
# Start the development server with a TypeScript file
npx gensx start ./src/workflows.ts
When you start the development server, you’ll see something like this:
🔍 Starting GenSX Dev Server...
ℹ Starting development server...
✔ Compilation completed
✔ Generating schema

🚀 GenSX Dev Server running at http://localhost:1337
🧪 Swagger UI available at http://localhost:1337/swagger-ui

📋 Available workflows:
- MyWorkflow: http://localhost:1337/workflows/MyWorkflow

✅ Server is running. Press Ctrl+C to stop.GenSX provides local implementations for most storage providers, enabling development without cloud dependencies:
.gensx/blobs) for development.gensx/databases) for developmentThe local APIs mirror the cloud APIs exactly, so code that works locally will work identically when deployed:
// This component works the same locally and in the cloud
const SaveData = gensx.Component(
  "SaveData",
  async ({ key, data }: { key: string; data: any }) => {
    // Blob storage works the same locally (filesystem) and in cloud
    const blob = useBlob(`data/${key}.json`);
    await blob.putJSON(data);
    return null;
  },
);
For more details see the full local development reference.
GenSX Cloud organizes your workflows and deployments using a flexible structure of projects and environments:
Projects are a collection of related workflows that are deployed together, typically corresponding to a codebase or application. Projects help you organize and manage your AI components as cohesive units.
Projects are defined by the projectName field in your gensx.yaml configuration file at the root of your codebase:
# gensx.yaml
projectName: my-chatbot-app
Environments are sub-groupings within a project that allow you to deploy multiple instances of the same workflows with different configuration. This supports the common development pattern of separating dev, staging, and production environments.
# Deploy to the default environment
npx gensx deploy ./src/workflows.ts

# Deploy to a specific environment
npx gensx deploy ./src/workflows.ts --env production
Each environment can have its own configuration and environment variables to match the rest of your deployed infrastructure.
Traces and observability data are also separated by project and environment, making it easier to:
This organizational structure is designed to be flexible and adaptable, allowing you to customize it to fit with the rest of your development, testing, and deployment lifecycle.
For more details see the full projects and environments reference.
For more details, contact us for enterprise needs.
Ready to build AI agents and workflows with GenSX Cloud? Follow our step-by-step quickstart guide to create and deploy your first project in minutes:
npm install -g gensxgensx new my-projectgensx start src/workflows.tsgensx deploy src/workflows.ts